
AI-generated content is taking over YouTube, and with the right tools, you can create high-quality viral videos without expensive equipment or advanced editing skills.
Recently, I came across a YouTube channel that gained 47K+ subscribers and millions of views in just a month—all using AI-generated content.
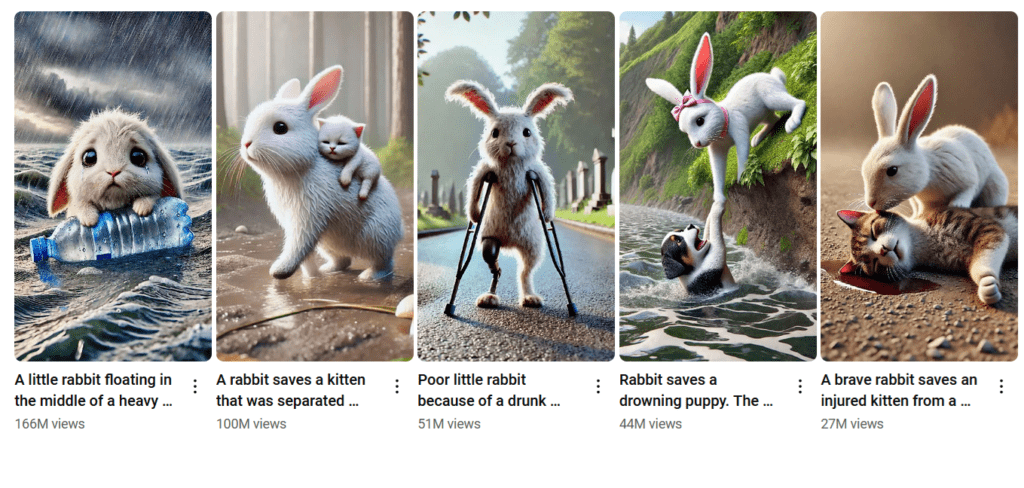
Another video that you must have seen that has over 166Million views on a channel called Rabbit’s Journey.
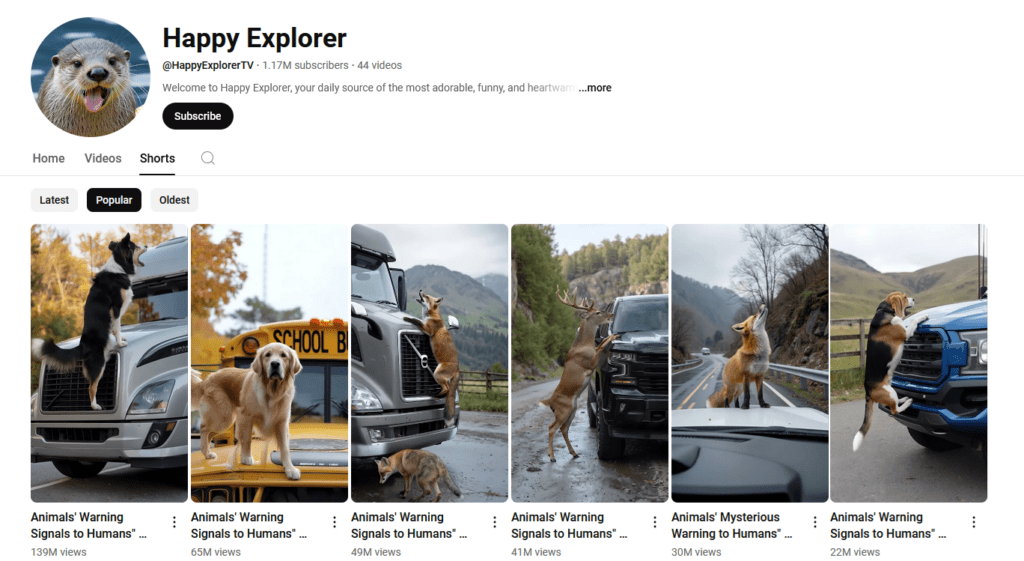
Here’s another example of a channel with a top video 120Million Views.
Looks insane, right? The best part? These videos are super easy to make!
In this guide, I’ll walk you through the exact steps to create viral AI-generated videos for free using smart automation tools like ChatGPT, Leonardo AI, Hailau AI, and CapCut.
What You’ll Learn in This Guide:
✅ How to find viral video ideas
✅ How to generate AI images and animations
✅ How to edit and add sound effects
✅ How to export and upload your video for maximum reach
Let’s get started! You can also watch the video below
Step 1: Find a Viral Video Idea
The first step in how to create viral AI videos is choosing the right video idea. Not all topics go viral—some have a higher chance of success based on audience interest and engagement.
How to Find Viral Video Topics
To maximize your chances of virality, focus on proven content formats that perform well. Here’s how to find the best topics:
- Check YouTube Trending & Shorts
- Visit YouTube’s Trending and Shorts sections to see what’s popular.
- Look for patterns in content style, duration, and topic.
- Analyze High-Performing AI-Generated Videos
- Search for “AI-generated stories” or “AI animation” on YouTube.
- Check videos with millions of views and high engagement.
- Look for videos with more views than the channel’s subscriber count (this means it’s getting recommended beyond its audience).
- Use Trend Analysis Tools
- vidIQ & TubeBuddy – Analyze trending topics & keywords.
- Google Trends – Check if interest in a topic is increasing.
- Reddit & TikTok Trends – Find viral content ideas.
Best Niches for AI-Generated Videos
Here are some popular categories that you may have noticed that are getting consistently get high views:
✅ Heartwarming animal stories (rescue stories, pet adventures)
✅ Motivational & inspirational content
✅ Mind-blowing facts & mysteries
✅ AI-generated storytelling (fictional stories, sci-fi concepts)
✅ Educational videos (history, science, psychology)
📌 Pro Tip: Once you find a viral video, don’t copy it—put your own twist on it. Ask ChatGPT to suggest similar but unique video ideas based on what’s trending.
Step 2: Generate AI Image Prompts with ChatGPT
Now that you have a viral video idea, it’s time to create the visuals using AI. Instead of searching for stock images or filming footage, we’ll generate custom AI images using ChatGPT and Leonardo AI.
Why Use ChatGPT for Image Prompts?
AI-generated images only look good when the prompts are detailed and specific. ChatGPT helps create structured, descriptive prompts that give you high-quality results in Leonardo AI.
How to Generate AI Image Prompts (Step-by-Step)
1. Identify Key Scenes from a Viral Video
- Watch a similar viral AI video in your niche.
- Take screenshots of 5-6 key moments (e.g., an emotional scene, a dramatic event, or an important visual).
- These screenshots will help structure your AI-generated visuals.
2. Use ChatGPT to Generate Image Prompts
- Open ChatGPT and enter this detailed prompt:Example ChatGPT Prompt:
“I want to recreate a viral video using AI. Below are key scenes from the video. Generate detailed Leonardo AI prompts to create high-quality, photorealistic images for each scene. Each prompt should be at least 5-6 sentences, ensuring consistency in character details, object colors, and lighting.” - If needed, tweak the prompts to adjust scene composition, facial expressions, and background details.
3. Organize Your Prompts for Consistency
To maintain visual consistency across images, ensure:
✅ Character details remain the same (hair color, clothing, expressions).
✅ Background elements match across different scenes.
✅ Lighting and color tones are consistent.
📌 Pro Tip: If you’re creating an animated video, include prompts that describe movement-friendly images (e.g., “a dog running through a forest with motion blur effect”).
Now that we have high-quality AI image prompts, it’s time to generate the visuals using Leonardo AI!
Step 3: Create AI Images with Leonardo AI
Now that we have detailed AI image prompts from ChatGPT, it’s time to generate the visuals using Leonardo AI. This tool creates realistic and artistic AI images, perfect for turning static scenes into engaging video content.
How to Use Leonardo AI for Image Generation (Step-by-Step)
1. Open Leonardo AI & Start a New Project
- Go to Leonardo AI and log in.
- Click “Create Image” to start a new project.
2. Paste Your ChatGPT-Generated Prompts
- Copy the AI image prompts from ChatGPT.
- Paste them into Leonardo AI’s prompt box.
3. Adjust the Settings for Best Quality
- Aspect Ratio → Set to 9:16 (ideal for YouTube Shorts & TikTok).
- Image Style → Choose photorealistic or cinematic for realistic results.
- Guidance Scale → Increase if you want more detailed images.
- Number of Images → Generate multiple variations and pick the best one.
4. Generate & Refine Your AI Images
- Click “Generate” and wait for the AI to create your images.
- If an image doesn’t look right (e.g., incorrect lighting or object positioning), tweak the prompt and regenerate.
- If you need adjustments, go back to ChatGPT, describe the issue, and ask for a revised prompt.
5. Ensure Consistency in All Images
To make your video look smooth and professional, ensure:
✅ Character details match across images.
✅ Backgrounds remain consistent.
✅ Colors, lighting, and object positions stay the same.
6. Download Your AI-Generated Images
- Once you’re happy with the images, download them in high resolution.
- Store them in a separate folder for easy access in the next step.
📌 Pro Tip: If your image needs small changes (like color correction or minor object adjustments), use Canva or Photoshop before moving to the animation stage.
Now that we have all the AI-generated images, it’s time to bring them to life using Hailau AI!
Step 4: Animate AI Images with Hailau or Kling AI
Now that we have high-quality AI-generated images, it’s time to bring them to life using Hailau AI.
This tool allows you to animate static images, creating smooth and realistic motion effects without requiring advanced animation skills.
Why Use Hailau AI for Animation?
✅ Transforms static images into motion graphics
✅ Maintains consistency in character movements
✅ Requires no manual animation skills
✅ Saves time compared to traditional animation tools
How to Animate AI Images with Hailau AI (Step-by-Step)
1. Open Hailau AI & Upload Your Images
- Go to Hailau AI and log in.
- Click “Create New Animation” and upload the AI-generated images you downloaded from Leonardo AI.
2. Use ChatGPT to Generate Animation Prompts
- Open ChatGPT and enter this prompt:Example Prompt for ChatGPT:
“I have AI-generated images that I want to animate using Hailau AI. Generate detailed animation prompts for each scene, ensuring smooth transitions, natural movements, and consistent character details.” - ChatGPT will create animation prompts describing motion details, such as:
- Character movements (e.g., “the deer slowly turns its head before running”).
- Camera effects (e.g., “a zoom-in effect to create emotional impact”).
- Scene transitions (e.g., “fade from night to day gradually”).
3. Paste the Animation Prompts into Hailau AI
- Copy the ChatGPT-generated animation prompts.
- Paste them into Hailau AI’s animation control panel.
- Click “Generate” to animate the images.
4. Review & Adjust the Animations
- Watch the animated preview to check if movements look natural.
- If the animation feels off, tweak the prompts:
- Adjust speed, movement intensity, and transitions.
- Ensure characters move smoothly without distortion.
- If needed, return to ChatGPT for refined animation prompts.
5. Download the Final Animated Clips
- Once satisfied, export each animated clip in high resolution.
- Store them in a dedicated folder for the next step—video editing.
📌 Pro Tip: If Hailau AI’s results aren’t perfect, try other AI animation tools like Runway ML or Kaiber AI for additional effects.
Now that we have animated AI visuals, let’s edit them into a polished video using CapCut!
Step 5: Edit Your AI Video in CapCut
Now that we have our animated AI-generated clips, it’s time to edit them into a full video using CapCut (or any other video editing software). CapCut is an excellent choice because it’s free, easy to use, and packed with features for adding effects, text, and sound.
Why Use CapCut for Editing?
✅ Beginner-friendly – No complex tools or learning curve
✅ Free to use – No watermark on exports
✅ Powerful features – Includes text overlays, effects, and transitions
✅ Optimized for YouTube Shorts & TikTok
How to Edit Your AI Video in CapCut (Step-by-Step)
1. Open CapCut & Create a New Project
- Download and open CapCut on your PC or phone.
- Click “New Project” and import your Hailau AI-animated clips.
2. Arrange Clips for a Smooth Storytelling Flow
- Drag and drop your clips onto the timeline in the correct sequence.
- Trim unnecessary parts to keep the pacing fast and engaging.
- If needed, use CapCut’s speed adjustment tool to slow down or speed up clips.
3. Add Transitions & Effects for a Professional Look
- Use smooth transitions (fade, zoom, slide) to make clip changes seamless.
- Apply motion blur or cinematic filters for a high-quality feel.
4. Include Text Overlays & Captions
- Use text overlays to highlight important points.
- Add automatic captions for better engagement (CapCut can generate these automatically).
- Choose bold, readable fonts that match your video’s style.
5. Sync the Video with Sound Effects & Music
Now it’s time to add sound effects and background music to enhance engagement.
- Import sound effects & background music (we’ll generate them in the next step).
- Sync audio with scene transitions and movements for a cinematic effect.
- Adjust volume levels to ensure voiceovers, sound effects, and music blend well.
📌 Pro Tip: Keep your video between 30 to 90 seconds for the best engagement on YouTube Shorts & TikTok.
Now that your AI video is fully edited, let’s move on to adding sound effects with Eleven Labs!
Step 6: Add Sound Effects with Eleven Labs
A great video isn’t just about visuals—sound design plays a huge role in making your content engaging and immersive. In this step, we’ll use Eleven Labs to generate high-quality sound effects and voiceovers for your AI video.
Why Use Eleven Labs for Sound Effects?
✅ AI-generated sound effects & voiceovers for better realism
✅ Customizable voices to match different video styles
✅ Natural-sounding AI narration for storytelling videos
✅ Enhances engagement and makes your video more professional
How to Generate Sound Effects with Eleven Labs (Step-by-Step)
1. Find & Download Background Music & Sound Effects
- Visit free sound effect libraries like:
- Mixkit – Free sound effects & music
- Freesound – Community-generated sounds
- YouTube Audio Library – Copyright-free music
- Download sounds like:
✅ Background music (emotional, cinematic, upbeat)
✅ Ambient sounds (wind, forest, city noise)
✅ Specific sound effects (footsteps, car passing, animal sounds)
2. Generate Custom Sound Effects with ChatGPT & Eleven Labs
If you need specific sound effects, you can generate them using AI.
- Open ChatGPT and enter this prompt:Example ChatGPT Prompt:
“I need short AI-generated sound effects for my video. Generate prompts for Eleven Labs to create realistic sounds of a car approaching, a deer running, and forest ambiance.” - Copy the ChatGPT-generated prompts and paste them into Eleven Labs.
- Click Generate and download the custom sound effects.
3. Generate AI Voiceovers for Narration
If your video needs a voiceover, use Eleven Labs’ text-to-speech feature:
- Paste your script or captions into Eleven Labs.
- Choose a voice style (calm, energetic, deep, female/male).
- Click Generate and adjust the tone & speed if needed.
- Download the AI voiceover file.
4. Sync Sound Effects & Voiceovers in CapCut
- Import all downloaded sound files into CapCut.
- Align voiceovers with the correct scenes.
- Place sound effects at key moments to enhance realism.
- Adjust volume levels to balance music, narration, and effects.
📌 Pro Tip: Keep background music subtle so it doesn’t overpower voiceovers.
Now that your video looks and sounds professional, it’s time for the final step—exporting and uploading it for maximum reach!
Step 7: Export & Upload Your AI Video
Now that your AI video is fully edited with animations, effects, and sound, it’s time to export and upload it for maximum reach. A well-optimized upload increases the chances of going viral on YouTube Shorts, TikTok, and Instagram Reels.
FAQs
1. Can I monetize AI-generated videos on YouTube?
Yes! As long as your content is original and engaging, you can earn from YouTube AdSense, affiliate marketing, and sponsorships.
2. Is AI-generated content allowed on YouTube?
Yes, but YouTube requires videos to be original and not just automated spam. Add a unique storytelling angle to increase engagement.
3. How long does it take to create an AI-generated video?
Once you master the process, you can create a full AI video in 2-4 hours.
4. What’s the best AI animation tool besides Hailau AI?
Other great AI animation tools include Runway ML, Kaiber AI, and Pika Labs.
5. How do I make my AI video go viral?
- Choose trending topics
- Optimize your title & tags
- Use an eye-catching thumbnail
- Promote on social media & Reddit
🔥 Now it’s your turn! Try this AI video creation method and share your results in the comments! 🚀

Thanks for all your efforts that you have put in this. very interesting info .